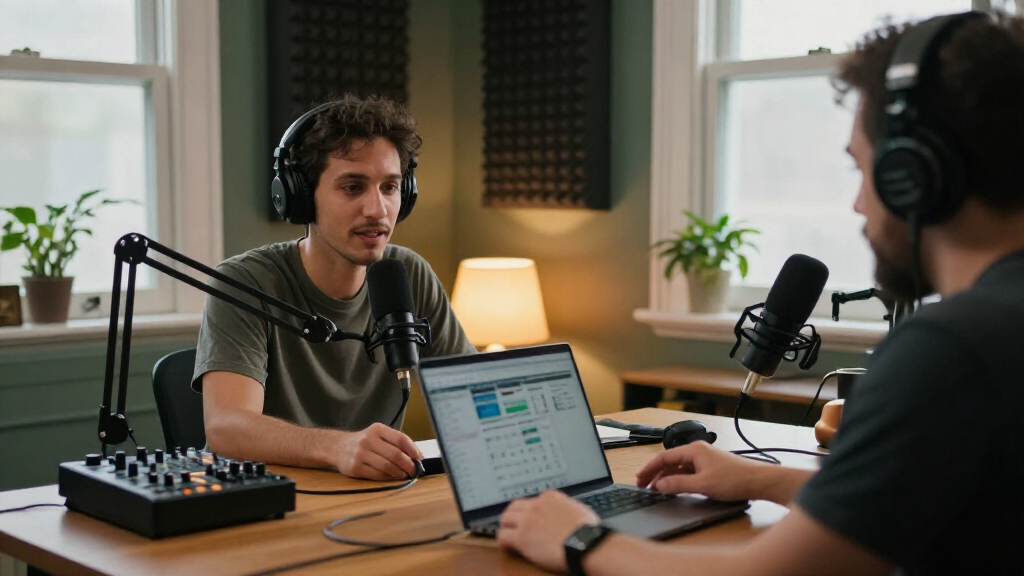

This checklist is for small business owners who want to assemble a podcast studio from a focused set of audio products. It can help you think through the pieces involved, whether you are setting up a dedicated recording space or choosing gear for more than one recording situation.

Get business pricing on office and shipping supplies
- Business-only prices and quantity discounts
- Tax-exempt purchasing
- Multiple users, one account, clear invoices
The checklist is organized by studio role: microphones, a boom arm, an audio interface, headphones, acoustic panels, and a portable recorder. Each section explains why that category matters and gives you practical points to check against your own setup.
Before buying, map out your recording workflow: how many people will record, where sessions will happen, and which connections your computer and other gear support. Use the look-for lists to compare the listed pick with your needs, and confirm fit and compatibility in the product details.
USB Microphones
A microphone is the first link in a podcast recording chain, so start by considering who will speak and where you will record. The listed pick, Shure MV7+ USB-C & XLR Podcast Dynamic Microphone with Stand – Black, names both USB-C and XLR connections. That makes connection planning especially relevant: check which route you intend to use and whether your computer or other audio equipment supports it.
A common buying mistake is choosing a mic based only on its connector or appearance. Think about the number of speakers, how close each person can sit to a microphone, and whether you need a separate mic for each voice. Check what the included stand is designed to do, how the mic will sit on your desk, and whether the product details specify any additional cables or mounting pieces you need.
For a small business setup, prioritize a clear, repeatable workflow. Confirm the connection you plan to use before ordering, and make sure the mic placement works with your desk and recording habits. If you expect to expand to multiple speakers, plan the full input and mounting setup rather than assuming one microphone will cover every session.
What to look for:
- Confirm whether you plan to connect by USB-C or XLR.
- Check that your computer or audio equipment supports the chosen connection.
- Consider how many speakers need microphones at the same time.
- Review the included stand and any separately needed mounting pieces.
- Plan microphone placement around your desk and speaking distance.
Shure MV7+ USB-C & XLR Podcast Dynamic Microphone with Stand – Black

The Shure MV7+ is a versatile dynamic microphone designed for podcasting, streaming, and content creation. It features OBS certification, advanced DSP noise reduction, customizable LED touch controls, and flexible connectivity options via USB-C and XLR.
Pros:
- High-quality sound with noise reduction and voice isolation
- Flexible connectivity options for various setups
- Customizable LED touch controls and app integration
Cons:
- May be complex for beginners due to advanced features
- Requires software for full customization
- Potentially higher price point
Best for: Small business podcasters choosing between USB-C and XLR connections
Not ideal for: Setups that have not confirmed connection or multi-speaker needs
Bottom line: Match the connection and mic placement to your recording setup before adding it to your kit.
Mic Boom Arms
A boom arm helps position a microphone where the speaker can use it comfortably. The listed pick is the RØDE PSA1+ Professional Studio Boom Arm. Before choosing any arm, consider the desk or surface where it will be attached and how you want the microphone positioned during a session. A useful setup should let the speaker reach a consistent position without crowding the work area.
One common mistake is assuming an arm will fit any desk or support any microphone. Check the product details for mounting requirements and supported microphone setup, then compare those with your desk edge, available clearance, and mic. Also consider whether the arm’s movement will interfere with a monitor, keyboard, lighting, or another person’s workspace. Think through where the arm will sit when it is not in use.
Fit is about more than attachment: the microphone should be easy to place at a comfortable speaking position. Check the reach and clearance against your actual desk arrangement, and verify any adapter or mount requirements. If the studio is shared, consider whether the arm can be adjusted for different speakers without requiring a full rearrangement each time.
What to look for:
- Check desk thickness and the arm’s stated mounting requirements.
- Verify that the arm supports your microphone and its mounting setup.
- Measure available reach and clearance around monitors and other equipment.
- Consider whether the arm can be positioned comfortably for each speaker.
- Plan where the arm will rest when the microphone is not in use.
RØDE PSA1+ Professional Studio Boom Arm

The RØDE PSA1+ is a professional studio boom arm designed for podcasters, streamers, and broadcasters. It features fully damped internal springs and a neoprene cover to ensure silent operation, along with integrated cable management and full 360-degree rotation for precise microphone placement.
Pros:
- Silent operation due to internal spring damping and neoprene cover
- Integrated cable management keeps setup tidy
- Full 360-degree rotation and extended reach for flexible positioning
- Highly rated by users for professional quality
Cons:
- Limited weight capacity (max 1.2kg) may not support heavier microphone setups
Best for: A desk-based studio that benefits from adjustable microphone placement
Not ideal for: Desks or layouts that do not match the mounting and clearance requirements
Bottom line: Confirm desk fit, microphone support, and reach before settling on this arm.
Audio Interfaces
An audio interface connects microphones and other audio sources to a computer-based recording setup. The listed pick is the Focusrite Scarlett 2i2 Studio 4th Gen USB-C Audio Interface Bundle. Check the bundle contents and compare the available inputs with the number and type of sources you expect to record. The product name identifies USB-C, so confirm that your computer and recording workflow support that connection.
A frequent mismatch is buying an interface without counting simultaneous inputs. Consider whether you will record one person, multiple microphones, or an additional source at once. Verify that the bundle includes the pieces you expect, and check whether your computer needs any separate cables or adapters. Also think about where the interface will sit so speakers can reach its controls and cables can connect without pulling across the desk.
Plan compatibility across the whole recording chain: microphones, interface, computer, and the software you plan to use. Confirm the connection type and input needs using the product and computer details. If your setup may grow, decide whether the listed input arrangement suits that anticipated workflow before choosing a bundle.
What to look for:
- Count how many sources you need to record at the same time.
- Check microphone connections against the interface inputs.
- Confirm your computer supports the stated USB-C connection.
- Review the bundle contents and identify any extra cables or adapters needed.
- Check that your recording software and computer work with the interface.
Focusrite Scarlett 2i2 Studio 4th Gen USB-C Audio Interface Bundle
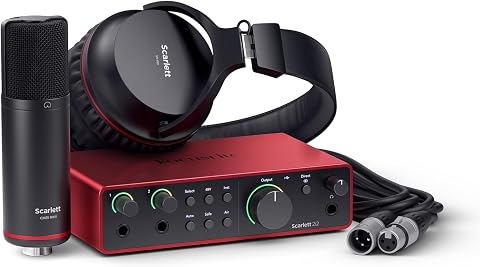
A two-channel USB-C audio interface bundle for recording, mixing, and mastering, with two low-noise mic preamps and studio-grade converters. It includes a CM25 MkIII condenser microphone, SH-450 headphones, recording software, and features such as Auto Gain, Clip Safe, and Air mode.
Pros:
- Includes microphone, headphones, and recording software
- Auto Gain and Clip Safe help simplify recording levels
- 120 dB dynamic range and up to 192 kHz sample rate
- Air mode adds presence to vocals and guitars
Cons:
- Requires compatible recording software and a computer or mobile device
- Two-channel input may limit larger recording setups
Best for: A small setup that has checked its simultaneous input needs
Not ideal for: Sessions needing more inputs than the interface provides
Bottom line: Verify input count, bundle contents, and computer connection before choosing this bundle.
Closed-Back Headphones
Headphones let a host monitor audio while recording and reviewing a session. The listed pick is the Focal Lensys Professional Closed-Back Headphones. Consider who will wear them, how long sessions usually run, and whether more than one person needs to monitor at the same time. The product name specifies closed-back; check the product details to understand the fit and connection options for your intended use.
A common mistake is assuming a single pair will cover a multi-person recording. Decide whether headphones are for the host, a guest, or post-session listening, then check whether you need extra pairs and how they will connect to your equipment. Review the stated cable and connector details against the interface or device you plan to use. If comfort matters for long sessions, look for fit information and consider how the headphones sit on the intended wearer.
Think through monitoring needs before selecting headphones: who needs to hear the recording, what equipment will they plug into, and how will you manage the cable around the desk? Confirm the connection and fit from the product details. A little planning helps avoid discovering during a session that the intended listener lacks a compatible connection or a comfortable fit.
What to look for:
- Check headphone connector and cable details against your equipment.
- Decide how many people need headphones during a session.
- Review fit information for the intended wearer and session length.
- Consider cable routing around desks, chairs, and other gear.
- Confirm how the headphones will connect for recording and playback.
Focal Lensys Professional Closed-Back Headphones

Focal’s Lensys Professional headphones feature dual aluminum/magnesium drivers and sound isolation design, providing detailed monitoring and authentic playback. They are designed for studio use, monitoring, and casual listening, with soft memory foam earpads and a sturdy headband for comfort.
Pros:
- High-quality aluminum/magnesium drivers deliver detailed sound
- Effective sound isolation for studio and casual use
- Comfortable soft memory foam earpads and sturdy headband
- Suitable for monitoring, recording, and playback
Cons:
- Wired connection may limit mobility
- Lack of foldable design for portability
- No water resistance for outdoor use
Best for: A host who has confirmed the headphone connection and fit
Not ideal for: Multi-person sessions relying on one pair of headphones
Bottom line: Match the fit and connection to each listener and the equipment they will use.
Acoustic Panels
Acoustic panels are a room-treatment consideration for a recording space. The listed pick is 2 Pack Acoustic Panels 47.2"x23.6"x2" Soundproof Fiberglass Panels, Bl. Its name specifies a two-panel pack and dimensions, which gives you a starting point for planning wall space. Check the full listing for complete product details and installation requirements before deciding where the panels could fit.
A common buying mistake is treating a panel purchase as a guarantee that a room will be soundproof or that every recording problem will be solved. Start by identifying where the panels could be placed and whether the wall area, furniture, and room arrangement allow it. Verify how the panels are intended to be mounted, what hardware is included, and whether the wall or surface is suitable. Keep the listed size in mind when mapping out a placement plan.
Make your decision based on the room you have, not a generic studio layout. Measure the available area, compare it with the stated panel dimensions, and read the product details for material and mounting guidance. If the recording area is shared or temporary, consider whether the installation approach works with that space and its use.
What to look for:
- Measure wall space against the stated 47.2 by 23.6 inch panel dimensions.
- Confirm the full product details and exact contents of the two-pack.
- Review mounting instructions and check what hardware is included.
- Consider how furniture and room layout affect possible placement.
- Check that the installation approach suits your wall and room use.
2 Pack Acoustic Panels 47.2"x23.6"x2" Soundproof Fiberglass Panels, Black

These acoustic panels are designed for superior sound absorption, reducing noise and echoes to create a clearer sound environment. Made with high-density fiberglass and wrapped in polyester fabric, they are suitable for various settings like studios, conference rooms, and entertainment venues.
Pros:
- Excellent sound absorption with NRC 0.95
- Includes hanging hardware for easy installation
- Suitable for various environments like studios and conference rooms
Cons:
- Fiberglass material may require careful handling
- Limited color options (black only)
Best for: A recording room with measured, available wall space
Not ideal for: Spaces where mounting requirements or wall fit are unresolved
Bottom line: Measure the room and confirm installation details before planning around this two-panel pack.
Portable Recorders
A portable recorder can be considered when your podcast workflow includes recording away from a fixed desk setup. The listed pick is the Zoom F6 Professional Field Recorder. Start by deciding whether you need a separate recorder for the locations or sessions you have in mind. Check the product details for its supported connections and recording setup, then compare them with the microphones and other sources you plan to use.
A common buying mistake is assuming a field recorder will automatically fit into an existing studio workflow. Confirm how recordings move from the recorder to your editing setup, what cables or storage the workflow calls for, and whether the recorder can handle the number of sources you need at once. Think about where it will be used and whether its controls and connections suit that environment. Use the product documentation for the specifics rather than inferring capabilities from the product name.
Plan for location and transfer before choosing a portable device. Check the connection needs of your microphones, how you will monitor during recording, and how files will reach the computer or editing process. If most sessions happen in one room, decide whether portability solves a real workflow need for your business.
What to look for:
- List the microphones and other sources you expect to connect.
- Check supported connections and simultaneous source needs in product details.
- Plan how recordings will transfer to your computer or editing workflow.
- Consider monitoring and cable needs at the intended recording location.
- Decide whether your sessions require a separate portable recording setup.
Zoom F6 Professional Field Recorder
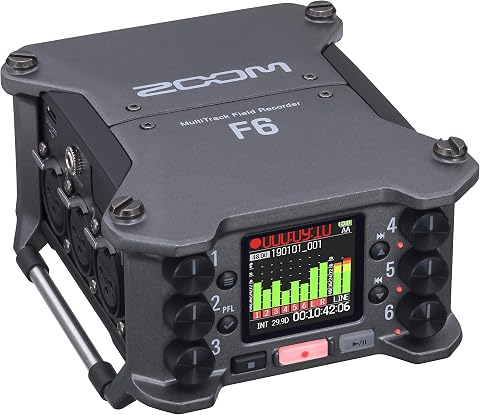
The Zoom F6 is a portable multitrack field recorder with 32-bit float recording and dual A/D converters for capturing a wide dynamic range. It has six XLR inputs, records up to 14 tracks, and includes timecode I/O for syncing audio with video.
Pros:
- 32-bit float recording with dual A/D converters provides wide dynamic range
- Six XLR inputs and up to 14 tracks support multitrack recording
- Timecode I/O supports audio and video synchronization
- Portable design with multiple power options
Cons:
- Requires four AA batteries when using battery power
- The description does not specify included storage beyond the stated 8 GB capacity
Best for: Podcasters who expect to record in more than one location
Not ideal for: Workflows that do not need a separate portable recorder
Bottom line: Choose it after confirming source connections, monitoring, and file transfer needs.
If you are building gradually, prioritize purchases by workflow: first decide how voices will be captured, then confirm the connection path through your computer or interface. Add mounting and monitoring pieces to suit the room and speakers, and consider acoustic panels and a portable recorder when their fit matches a specific need. This buying order helps each item serve a clear role in your setup.
Use the checklist as a starting point, then verify the product details against your desk, room, computer, and recording plans. A practical studio grows through compatible choices that make sessions easier to repeat. Start with the setup you can support today, and build from there as your podcast workflow takes shape.