
TL;DR
Moving your rig into a closet or small space can cut noise and reflections dramatically—if you prioritize placement, ventilation, and absorption. Foam alone isn’t enough; sealing gaps and understanding sound paths matter more.
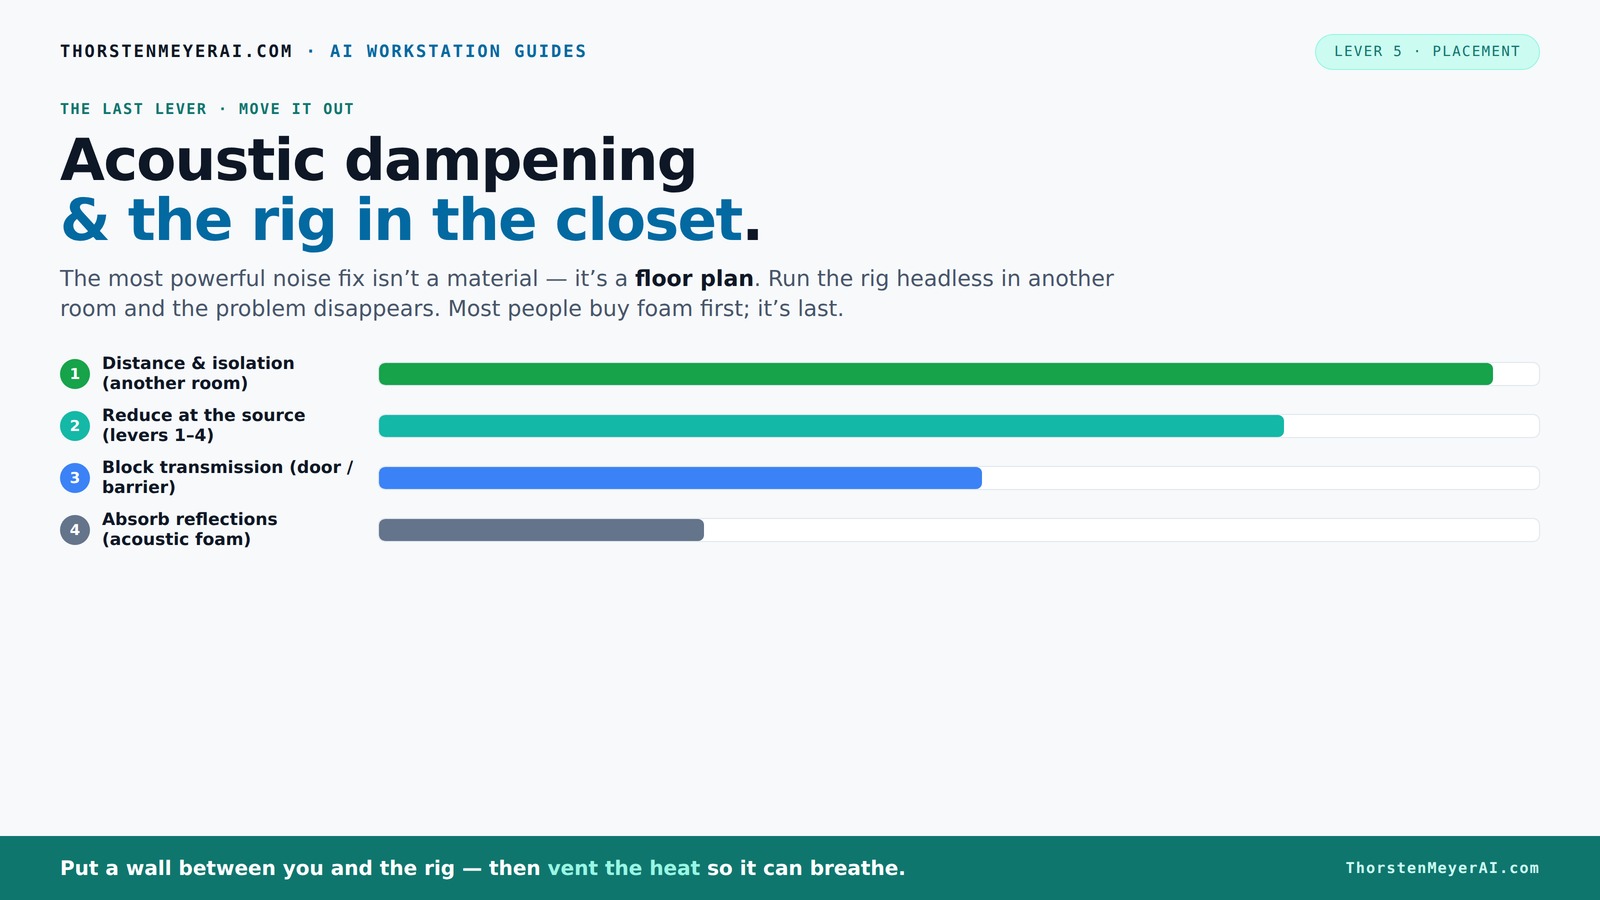
Acoustic dampening
& the rig in the closet.
The most powerful noise fix isn’t a material — it’s a floor plan. A rig you can’t hear because it’s in another room beats any amount of foam. Tap the approaches in Part 1 to see what actually works.
(another room)
(levers 1–4)
(door / barrier)
(acoustic foam)
Contain the noise, not the heat
Key Takeaways
- Moving your rig into a different room or closet is the most effective way to reduce noise without complex treatments.
- Ventilation is essential in sealed spaces—passive vents or quiet exhaust fans prevent heat buildup and hardware throttling.
- Focus on placement: treat reflection points around your mic, especially the wall behind it and the ceiling, with thick absorption materials.
- Corners matter less than treating all reflective surfaces in tiny spaces, especially for low-end control.
- Use household materials creatively—blankets, rugs, and foam panels— to build a cheap, effective recording booth.

36 Pack AUSLET Acoustic Panels 12 x 12 x 2 Inches, Pyramid Sound Proof Foam Panels for Wall, High Density Black Acoustic Foam Panels,Soundproof Wall Panels
【Improve Sound Quality】Auslet acoustic foam help much in improving audio and video quality by absorbing and eliminating unwanted...
As an affiliate, we earn on qualifying purchases.
As an affiliate, we earn on qualifying purchases.
Why Moving Your Rig Is the Biggest Sound Hack
Ever notice how a rig in another room is almost silent? That’s because distance is the most powerful tool against noise. Moving your setup into a closet, basement, or spare room cuts sound transmission to a fraction. You don’t need a fancy soundproof studio—just a quiet space where the noise can’t reach you. Think of it like a sound fortress—your workspace stays silent while the rig roars behind closed doors.
For example, many voice-over artists keep their mics in a closet while editing on a quiet laptop. The hardware can stay loud and hot, but you won’t hear a thing. All it takes is a solid network connection and a little ventilation.

TroyStudio Portable Vocal Booth, Large Foldable Microphone Isolation Shield, Music Recording Studio Sound Echo Absorbing Box, Desk & Stand Use Reflection Filter with Thickened Dense Acoustic Foam
【BASIC INFO】: Inside size after setup: 8'' (L) X 10'' (W) X 12'' (H), large space for various...
As an affiliate, we earn on qualifying purchases.
As an affiliate, we earn on qualifying purchases.
The 'Rig in the Closet' Setup: How to Keep It Cool and Quiet
Placing your machine in a closet is a genius move—if you handle the heat. A sealed space traps warmth, turning your quiet refuge into a sauna for your hardware. Continuous 600W GPU loads can raise temps by 10-15°F per hour if unchecked. That’s a quick recipe for throttling and loud fans.
Solution: add ventilation. A passive vent or a quiet exhaust fan keeps hot air flowing out while fresh cool air comes in. For serious setups, consider a soundproof cabinet with ducted airflow and thermostatic controls. Check out [this guide](https://thorstenmeyerai.com/reduce-heat-noise-ai-workstation/) for more cooling tips.

Focusound 52 Pack Acoustic Foam Panels 1" x 12" x 12" Sound Proof Foam Panles Soundproofing Noise Cancelling Wedge Panels for Home Office Recoding Studio with 300PCS Double-Side Adhesive
Soundproofing - Acoustic foam panels triangular grooves structure for better noise absorption, helps to reduce and absorb unwanted...
As an affiliate, we earn on qualifying purchases.
As an affiliate, we earn on qualifying purchases.
Placement Secrets: Microphone, Reflections, and Surfaces
Sound quality hinges on where your mic sits and what’s around it. In tiny spaces, reflections bounce off walls, ceiling, and furniture—creating a boxy, muddy sound. The first step: position your mic away from hard surfaces and aim it at a reflection-free zone. Use the classic '3-foot' rule: keep the mic at least three feet from reflective surfaces.
Example: In my closet setup, I placed the mic a foot away from the wall behind it, pointing toward a foam panel. This reduced echo and made my voice sound fuller and clearer. Always treat the reflection points—especially the wall behind you and the ceiling—by adding absorbent material.

SmartStandard 32in x 80in Slab Door, Solid Core French Doors Interior, White Primed Shaker for Pantry, Bathroom, Laundry, Pre-Assembled Panel Without Hardware Kit
【White Primer】The surface of pantry doors is a smooth white primer that can be transformed to suit your...
As an affiliate, we earn on qualifying purchases.
As an affiliate, we earn on qualifying purchases.
Where to Place Absorbers for Real Results
In small rooms, absorption isn’t just about filling corners. It’s about targeting the most reflective surfaces. Use foam or panels on the wall behind your mic, the ceiling directly above, and the desk surface. Thicker panels (2-4 inches) help tame low frequencies, which tend to build up more in tight spaces. For more on acoustic treatment, see this guide.
For instance, a DIY closet booth might use a couple of 2-inch foam panels on the wall behind the mic, a rug on the floor, and a blanket over the door. These simple steps cut echo and low-end muddiness.
Corners and Low-End: Do They Really Matter?
Many say corners are the low-frequency hot spots—true, but not the whole story. In tiny closets, low frequencies bounce off every surface, not just corners. What counts more is treating the walls, ceiling, and desk surfaces. Use bass traps if possible, but even thick foam or blankets can help reduce boominess.
For example, adding a bass trap in the closet's corner can reduce muddy low notes, making vocals sound clearer. But don’t forget to treat the reflective ceiling and nearby walls for a balanced sound.
DIY Materials That Actually Work
Don’t buy into the idea that foam is the answer. In small spaces, thick blankets, moving pads, and rugs do a better job absorbing sound and low frequencies. Use old comforters or quilts over the door, and hang blankets on the walls. For bass, stack some books or buy inexpensive bass traps.
Example: I used a thick blanket over my closet door, which made a noticeable difference in reducing echo. Plus, it’s cheap and easy to move around.
Sealing Gaps and Managing Door Leaks
Sound escapes through gaps. Seal cracks with weatherstripping or acoustic sealant. Hang a moving blanket or heavy curtain over the door to block leaks. Even small cracks around the door frame can leak enough sound to ruin your recordings.
For example, I taped weatherstripping around my closet door, which cut down the leak by over 50%. Combined with a blanket, the difference was night and day.
Tiny Space Acoustics: Handling Standing Waves and Low Frequencies
Small rooms often develop standing waves—where certain low frequencies get trapped and cause boomy, boxy sound. To fix this, treat surfaces where these waves form, especially near the mic. Using thicker insulation or bass traps in corners can help tame these resonances. Learn more about acoustic treatment at this site.
In my closet, adding a foam panel in the corner behind the mic reduced low-end boom and made my voice sound more natural.
DIY Tips for a Quiet, Effective Closet Booth
With household materials, you can craft a decent voice booth. Hang blankets or quilts from hooks or curtain rods. Use foam panels from Amazon—check [this link](https://www.amazon.com/dp/?tag=dreamridiculo-20)—for inexpensive sound absorption. Add rugs, cushions, and even cardboard for quick fixes.
Example: I built my mini booth with a few blankets, some foam, and a cardboard frame. It’s not perfect, but it works for casual recording and voice-over work.
Frequently Asked Questions
What’s the difference between acoustic dampening and soundproofing?
Acoustic dampening reduces reflections and echoes within a space, making recordings clearer. Soundproofing blocks sound from entering or leaving a room, which often requires more extensive construction like sealing gaps and adding mass.
Where should I place acoustic panels in my closet booth?
Focus on the reflection points—mainly the wall behind your mic, the ceiling directly aboveectly above, and the nearby desk surface. Thick panels on these spots absorb reflections and reduce echo, making your recordings sound more natural.
Do I need bass traps in a small closet?
Yes, especially if you notice boomy low notes or a boxy sound. Use bass traps in the corners to absorb low frequencies that tend to accumulate in tiny spaces. Even DIY traps can make a big difference.
How thick should the treatment be for a closet?
Use at least 2-inch thick foam or panels for general absorption. For low-end control, thicker (3-4 inch) bass traps work better. Thicker materials absorb lower frequencies more effectively in small rooms.
How do I prevent sound leaks under the door?
Seal gaps with weatherstripping or acoustic sealant. Hang a thick blanket or curtain over the door. These DIY fixes drastically reduce sound escape, improving your room’s overall sound isolation.